Before any roof repair work begins, you’ll want to do a quick inspection. Go into your attic or crawlspace, and take high-resolution pictures of any damage you see.
Look for water stains on the ceiling, or a trail of dripping and dampness that can lead back to its source. Also, check for cracked housings on plastic roof vents and broken seams on metal ones.
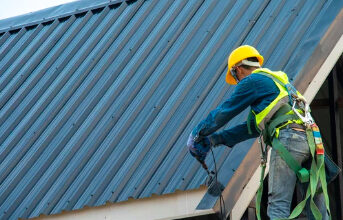
 Damaged Shingles
The shingles on your roof protect it from rain, snow, and other weather. When a shingle is damaged, it creates an opening through which moisture can enter the house and cause a leak. If you see a damaged shingle, it is essential to repair it as soon as possible. The good news is, that fixing a shingle roof leak on your own is a relatively easy home improvement project. The only tricky part is determining what type of shingle roof leak you have and how to fix it.
The first step is to gather your supplies: a ladder, a pry bar, a hammer, and replacement shingles. You’ll also need a tool belt to keep small tools within reach while you work.
Using the pry bar, loosen the shingles on the row directly above the damaged shingle. Then, lift that shingle to expose the first row of nails. Pull out the nails, and slide the new shingle into place. To prevent shingles from flying away during the process, gently round the back corners of the shingle with your utility knife.
Once the shingle is in place, apply a thin coat of roof cement over it. Then, nail down the new shingle with four roofing nails. Make sure to use galvanized nails, and hammer them in at a slight angle to avoid splitting the shingle.
Before you finish, sweep up any shingle pieces that have fallen around the repair site and dispose of them properly. Then, check the surrounding shingles for cracks and looseness. If necessary, repair them now with a bit of sealant.
Shingles can also be damaged by pests digging for food, creating nests, or just trying to find a warm, safe place to shelter. Any shingle that is punctured or surface damaged by these pests should be replaced. Also, any shingle that is missing its granules needs to be replaced immediately. Without these ceramic granules, the shingle is exposed to UV damage that can warp and weaken it. A smattering of granules isn’t a big deal, but if all or most are gone, the entire shingle should be replaced.
Leaking Flashings
Roof flashing is the thin sheet metal that connects various parts of your roof, and prevents water leaks in vulnerable areas. It’s located around chimneys, in valleys, along dormers, sidewalls, and skylights as well as to protect pipe collars and other features. It’s important to have all the flashing in good condition, or water can seep through the joints and valleys of your roof.
Flashing also needs to be resealed occasionally. Over time the caulking and roof cement that lines and seals the flashing can dry out, crack, and crumble, allowing water to seep through. A roofer will usually reseal these areas with caulking that is designed for use on roofs.
Leaks from leaking flashings often occur at the joints, where two pieces of flashing meet. They can be caused by high winds pulling the flashing away from the roof, or they can be due to the rapid expansion and contraction of your roof membrane as it shrinks and expands.
Signs of flashing leaks include sagging and curling shingles above the leaky area as well as rust or corrosion on the flashing itself. Also, look for areas where the flashing has been lifted or detached from the shingles.
A leaking chimney flashing can lead to rotted framing and sheathing, destroyed insulation, and water-stained ceilings. It’s best to have this fixed before the damage spreads, so check the flashing regularly.
If the flashing is still in good shape, a roofer may just need to replace the shingle that covers it. They will remove the shingle, nail down the new one, and apply some kind of roof cement to the seam and edge of the shingle.
Leaking step flashing on a dormer or sidewall can be a little more tricky to repair. First, the roofer will need to remove any shingles and siding that are in the way. They will then need to remove the step flashing, which can be a little more labor-intensive than just removing and replacing a shingle.
The next step is to slip a piece of ice-and-water barrier (available where roofing repair products are sold) under the flashing at the soffit/main roof joint. Then they will lay a new piece of flashing and nail it in place, making sure that the nail heads are covered with roofing cement as well.
Leaking Vent Boots
The flimsy plastic or rubber vent boots that seal the plumbing vent pipes on your roof have a short lifespan and are one of the most common sources of roof leaks. When these boots crack or wear out, rainwater seeps down the pipe and into your home, damaging expensive wood flooring, drywall, and insulation. The cost of repairing this type of water damage is usually in the thousands of dollars, and it promotes the growth of mold and mildew that can be toxic to people and pets.
Most homes have several plumbing vent pipes that run up from kitchen and bathroom sinks to the roof shingles. Often, these are the source of leaking water in the attic. Generally, these plastic or rubber vent boots last about twelve years before they start to break down and deteriorate. If you notice water spots on the ceiling near these vents, it is probably time to replace them.
A leaky roof vent boot can also allow radon gas to escape from your home, which is dangerous to your health. You can prevent these problems by ensuring that your pipe boots are in good shape and sealed tightly to the roof.
Leaking vent boots are usually caused by weather changes that cause the roof to contract and expand. The flimsy vent boots used on most new homes can easily shift and pull apart from the metal vent pipe, allowing rainwater to enter your home along the pipe.
Replacing your roof vent boots is a relatively simple project that can save you the cost of a full roof replacement. You can find a variety of plastic and rubber boot replacements at most home improvement stores. For a more durable option, try a galvanized steel or lead boot that can be cut to fit your roof pitch and bend down into the collar of the vent pipe for a secure seal.
If you prefer to avoid the hassle of working on your roof, you can have a professional roofing contractor do the job for you. It may be cheaper than having to pay for a new roof, and it will ensure that the job is done correctly.
Leaking Gutters
Gutters are a critical component of any roof, protecting the house from foundation damage and basement flooding. They work to take rainwater runoff from the roof and disperse it via a system of downspouts away from your home’s foundation. But if the gutters themselves leak, they can cause a host of problems. Moisture in the surrounding areas can lead to musty odors and promote the growth of mold and mildew which can then spread through walls, ceilings, and windows. It can also rot wood and promote the growth of pests like rodents and cockroaches.
If you notice any of these symptoms in your home, call a professional right away. A leaking gutter may seem minor but it can lead to expensive repairs if left unattended. The best way to protect your investment and your home is to have a professional inspector assess the problem immediately.
Leaking Gutters
A leaking gutter is usually the result of poor gutter installation, but can also be caused by an improper slope, hanger deterioration, or other factors. Leaks typically appear around the joint areas where sections of the gutter connect and the downpipes. In metal gutters, these areas can corrode over time, leading to leaks. In plastic gutters, the joints can often be resealed with a gutter sealant.
To check for a leaking gutter, first examine the fascia boards and soffits located behind the gutters. Look for signs of moisture, rotting wood, and any paint peeling. These are all indications that the gutters are leaking. Next, use a ladder to inspect the gutters themselves and note any areas where water is collecting or dripping. You should also check the joints and seams to ensure they are sealed correctly. A good test is to pour water over the area and see if it beads up. If it doesn’t, you will need to repair or replace the gutters. Often, repairing the joints is enough to resolve the problem but in severe cases, gutter replacement may be required.